Introduction
Of the nine classes in this game, only two are dedicated to tanking.
The two obviously are Guardians and Wardens. There are several
differences of note between Wardens and Guardians, but those relevant to
tanking are these:
- The obvious Medium armor worn by Wardens and Heavy armor worn by Guards.
- Proactive tanking and reactive tanking – a Guardians tanking ability is based mostly on reacting to situations like attacks and blocks, while Wardens tank by using various Gambits that they actively build.
- ToT (threat over time) vs. forced taunts and instant threat – Warden threat is generally built over time while Guards generate immediate threat and force mobs to attack them. Wardens do have one force taunt which is derived from a legendary trait.
These three differences are why many consider Wardens to be inferior
tanks. The fact of the matter is that a bad Guardian can still do well
while tanking because he has instant threat and forced taunt skills,
which can make him appear to be tanking better. Just as an example as to
how this works, let's take a random Guardian. He's ok at his job, not
great, but since he opened with a force taunt he held threat for 10
seconds and then lost it to a Hunter. The Hunter will think, "Ok, I was a
bit aggressive, that's why I pulled the mob off of my tank". Wardens
don't have this privilege; unless our single force taunt (which is a
legendary trait that I'll explain later) is equipped we can't force
targets onto us, so a mediocre Warden will appear to be a bad tank while
a mediocre Guardian will appear to be doing well.
It is for this reason critically important to understand the
fundamentals of Warden tanking -- how to do it and why to do it,
otherwise you will not succeed at tanking.
Terminology
- Gambit – a skill built up using gambits builders, listed below.
- Gambit Builder – refers to the 3 icons that appear in various gambits
- Gambit Display – a UI element showing the current gambit that you are building.
- Fist Gambit – any Gambit beginning with a fist icon, these are the ones that generate threat.
- Shield Gambit – any Gambit beginning with a shield icon.
- Spear Gambit – any Gambit beginning with a spear icon.
- HoT – Heal over Time.
- DoT – Damage over Time.
- ToT – Threat over Time.
- TI - Threat Increase.
- Way of the X – Warden Trait lines and name of trait line capstone traits.
Gambits
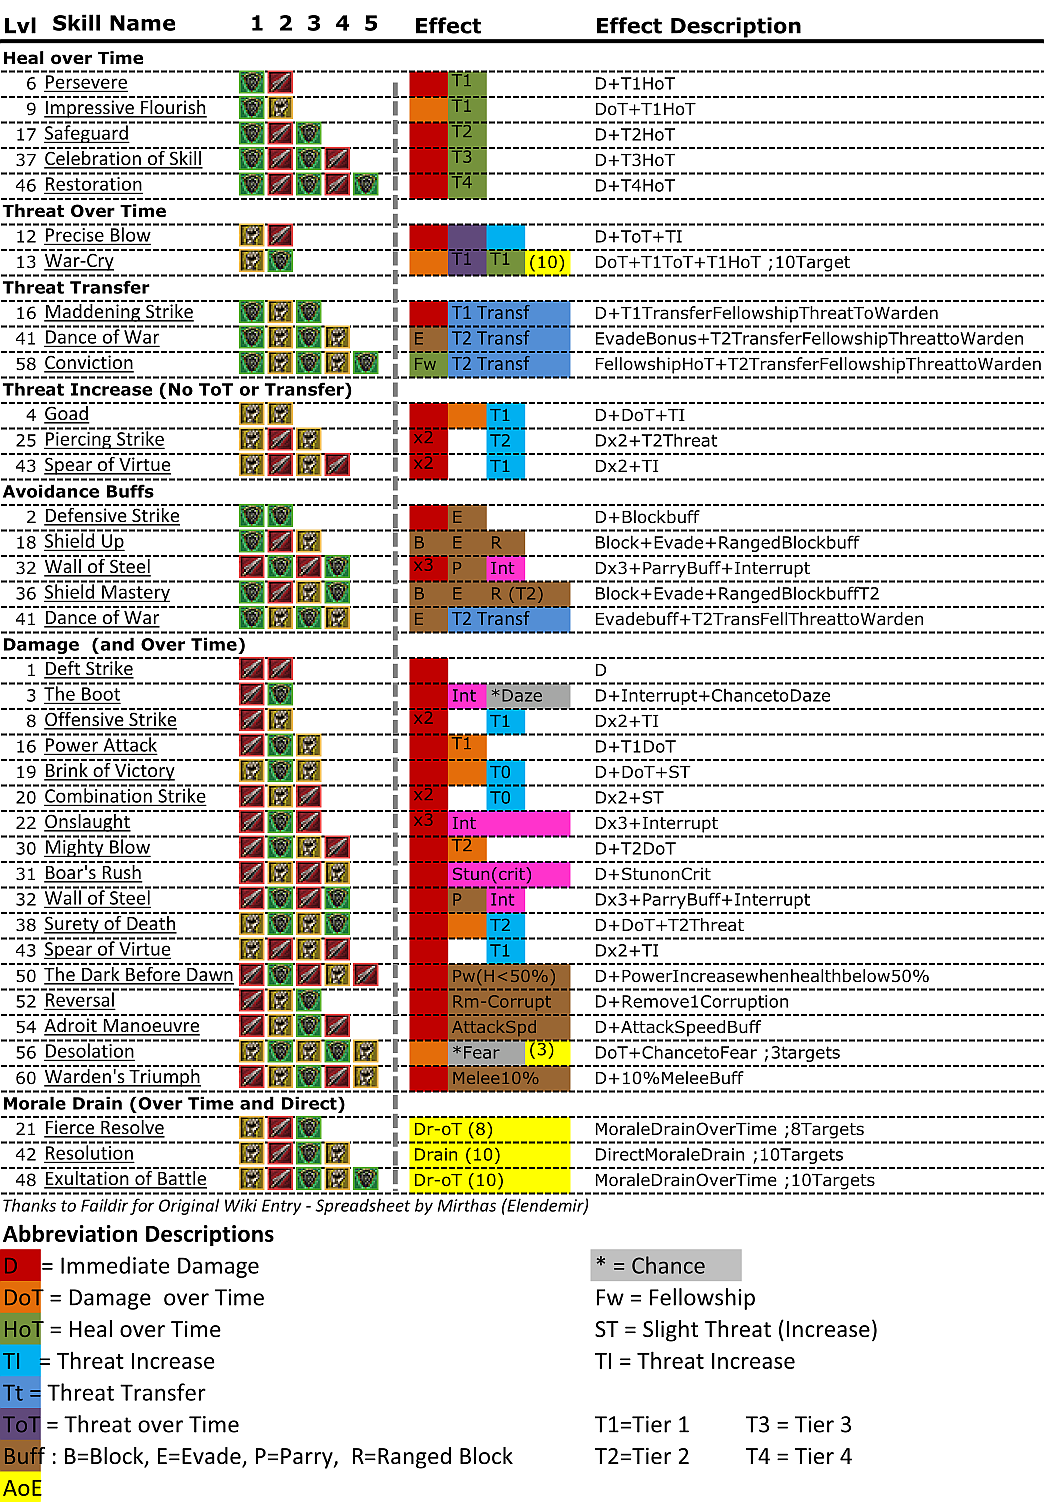
The Warden has many skills he can access; nearly 40 of them are Gambits though not all are tanking related.
Each Gambit is built from 3 distinct Gambit builders, they are:
- Quick Thrust – does direct damage. It places a spear in the Gambit display. It is generally abbreviated as a "sp" or as the number 1.
- Shield Bash – does some damage and has a chance to give a short buff to the Block rating. It places a shield icon in the Gambit display. It is generally abbreviated as a "sh" or as the number 2.
- Warden's Taunt – generates moderate amount of threat and does light-style damage over time. It places a fist icon in the Gambit display. It is generally abbreviated as a "fi" or as the number 3.
The Gambits built by a Warden can be as short as 2 icons and as long
as 5 icons. A 1 icon gambit can be triggered as an "unfinished" or
default gambit. First it must be noted that the ToT (threat over time)
of all threat building gambits stack with themselves and can pulse at
the same time, thus spamming the same gambit over and over does not
negate the ToT from a previous use of that gambit. Threat generating
Gambits can be separated into several groups (order of gambits within
the groups not indicative of value). Threat over time is
always an "invisible" DoT -- you cannot see a pulsing threat over time
marker on a mob.
Single Target
Several gambits affect only one target. Generally used on a single
boss for establishing threat, they vary in strength and effects. Some
have a ToT component and some only create threat via healing or weapon
aggro and have no ToT component.
| Level | Name | 1 | 2 | 3 | 4 | 5 | Effect |
| 12 | Precise Blow | Damage + ToT + TI | |||||
| 43 | Spear of Virtue | Damage x2 + TI | |||||
| 9 | Impressive Flourish | DoT + T1 HoT |
AoE Threat
These Gambits generate threat on several targets, they are also
short, only 2 icons each and are thus a quick and efficient way to
generate threat on several mobs, they vary in strength and number of
mobs targeted.
| Level | Name | 1 | 2 | 3 | 4 | 5 | Effect |
| 4 | Goad | Damage + ToT + TI. Affects 3 targets (6 if trait is equipped) | |||||
| 13 | War-Cry | DoT + T1 ToT + T1 HoT. Affects 10 Target |
Morale Leaches
These gambits affect multiple targets and when tanking multiple mobs
become a huge asset to the Warden since they heal you. They work by
doing the following: they damage your target and transfer that damage
into your morale pool. Morale leaches are not classified as either DoTs
or HoTs and are thus unaffected by any trait which boosts a DoT or HoT.
Fierce Resolve and Exultation of Battle leach morale over time, they
have an initial pulse and last 16 seconds pulsing every 4 seconds.
| Level | Name | 1 | 2 | 3 | 4 | 5 | Effect |
| 21 | Fierce Resolve | Affects up to 8 targets. At level 60 can heal as much as 200 to 300 morale a pulse. | |||||
| 42 | Resolution | Affects up to 10 targets for one large morale leach. At level 60 can transfer as much as 1700 morale. | |||||
| 48 | Exultation of Battle | Affects up to 10 targets. Has a ToT of 2x. At level 60, it can heal as much as 600 to 700 morale a pulse. This Gambit is worthy of special note because once received it is one the most important gambits in a Warden's arsenal and (alongside Conviction, which will be mentioned shortly), should be a regular part of your rotation when tanking multiple mobs. |
Threat Leaches
A Warden has several Gambits that can draw threat from members of his fellowship and transfer it to him. These transfers are not over time and occur instantly -- they work much like a Champion's Rising Ire skill in that they transfer a set amount of threat from all members of your fellowship. You will be able to see the effects of these gambits if a fellowship member (healer usually) gets aggro and then (once the gambit is used) the mobs run over to you.
Threat transfers cannot be resisted, making them especially useful for enemies that are resistant to taunts.
| Level | Name | 1 | 2 | 3 | 4 | 5 | Effect |
| 23 | Maddening Strike | Transfers a slight amount of threat from group members, also does direct damage. | |||||
| 41 | Dance of War | Transfers a moderate amount of threat, also increases Evade rating. Has long animation with effects received only once animation has completed. | |||||
| 58 | Conviction | Transfers moderate amount of threat and heals group over time, about 130 morale a pulse (when Shield capstone is traited). Worthy of special note because once received it should be used in any tanking situation, because it reduces the threat of your group, increases your threat and heals the group thusly generating threat on all mobs and helping your healer. |
Defensive Gambits
The following don't generate threat but do increase Block/Parry/Evade (BPE) ratings.
- Defensive Strike (level 2, icons: sh-sh or 22) – increases your block rating.
- Shield Up (level 18, icons: sh-sp-fi or 213) – increases your block, evade and ranged evade ratings.
- Shield Mastery (level 36, icons: sh-sp-fi-sh or 2132) – greater increase to block, evade and ranged evade, does not stack with Shield Up and will override it.
- Wall of Steel (level 32, icons: sp-sh-sp-sh or 1212) – increases your parry rating. Every attack (at more damage than your weapon normally does) is also an interrupting attack.
Force Taunts
Wardens have a single forced taunt Gambit named Defiant Challenge
(icons: fi-sp-fi-sp-fi or 31313) - it is rewarded for completing the
book Bullroarer's Boy and equipping the rewarded trait. It is 5 icons
long and has a long animation, at the end of which the forced taunt is
activated (which force taunt lasts for 5 seconds or until someone
generates additional non-weapon aggro, either by healing or by
taunting). This gambit also has a damage reflection component and will
reflect common, fire and shadow damage and at level 60 will reflect 44
points of damage from each target.
Stances
Wardens have 4 stances; only 3 though are tanking stances.
- Determination (level 12) – increases your In-combat Morale Regeneration, at early levels this stance will make your ICMR greater than your OCMR.
- Conservation (level 22) – increases your In-Combat Power
Regeneration, also increases block and evade ratings, is considered to
be better than Determination at higher levels because building gambits
can be a burden on power consumption and the block and evade buffs are a
great buff that require no effort on your part. Also, in a fight where a
boss or several mobs are hitting you for hundreds of damage points, 800
ICMR points will not make a difference, but the extra evade or block is
better because it means you avoided damage that now doesn't need to be
healed.
- Way of the Warden – a stance received by completing both level
45 class quests and equipping the trait rewarded, it combines elements
from the 3 other stances, increases ICPR, ICMR, increases damage and
increases attack speed. It can only be activated in combat and has a
long cool down.
- Recklessness (level 34) - increases your melee damage and reduces attack duration, but also reduces parry and evade by a small amount.
Masteries
Wardens have 3 traits known as masteries; each of these will give you 2
skills each of which will apply 2 icons to the display. These skills can
only be used in combat. The advantage to using these skills is that not
only do they instantly add 2 icons thus increasing the speed with which
you build Gambits, they also reduce your power consumption and do not
require that you be in range of your target. The deeds for the
acquisition of these traits are: Master of the Spear (starts at level
40) and gives you the skills Spear and Shield, and Spear and Fist,
Master of the Shield and Master of the Fist are both activated at level
50 and give you the skills Shield and Spear, Shield and Fist, Fist and
Spear, and Fist and Shield.
Javelin Skills
- Ambush (level 10) – after a 5 second induction the Javelin is thrown, stunning your target. You can then run up and use Critical Strike to do additional damage. generates weapon aggro and isn't equal to a taunt, however, opening a fight with this skill will give you a lead in threat early in the fight. It should be noted that while in stealth the skill has no induction, however the Warden's stealth skill Careful Step has an induction just as long as the Ambush induction and Careful Step only lasts for 20 seconds, so unless you have a racial stealth skill or have a Burglar who can use the skill Share The Fun, you must use it quickly. (Share the Fun is a burglar skill which allows you to be in stealth with the Burglar so long as you stand close to him, although it's generally best to just use Ambush without stealth.
- Wages of Fear (level 38) – while not generating threat, when this skill is fired from behind the target, it will do a large amount of damage (it can crit for as much as 4000 damage points and more depending on level and weapon). Using this skill at the start of a fight skill will give you a healthy lead in threat by generating weapon aggro.
- Javelin of Deadly Force – Legendary skill awarded for completing the book The Watch Against the Night and equipping the legendary trait. This skill has a range of 30 meters and cannot be targeted on a target; it will fire in the direction you are facing regardless of the mob you have selected. It will hit up to 10 targets along its path and within a certain radius of its path. Also, when on a slope the Javelin will fire forward and not up or down the slope. While it does have an ability to hit targets slightly above or below, it is advised to aim at targets on level with you. While not generating threat, this skill will hit multiple targets for a decent amount of damage, allowing the Warden to get a lead on threat on up to 10 mobs.
Other Skills
Wardens have 2 utility skills which are used for removing a single
icon from the gambit display or removing all icons in the display. They
are called Recovery (level 10) which clears the display and Quick
Recovery (level 24) which removes one icon.
Reversal: Spear-Fist-Shield
Removes one corruption from the target when it hits. Very useful in fights where mobs stack corruptions very fast.
Traits
As a tank, traiting appropriately is one of the most important things
you can do to insure you will succeed at your role. It will assist you
and possibly your fellows in completing that which you are going to
attempt.
Virtues
The question of which Virtues to equip can't be clearly defined as each
virtue will affect you in a different way. Because of this, it is best
to equip according to where you are tanking. In general, it is
considered a good idea to trait Innocence which will reduce 5% of
incoming melee damage at rank 10. Valour is recommended for solo play.
As a tank, it is important to trait according to what you'll be facing
in an instance -- for example in an instance with a large amount of mobs
that deal wound debuffs it is best to trait Charity, if poison is the
main challenge in the quest you are facing then Honour should be your
choice.
Class Traits
While soloing, equipping Way of the Spear traits may be nice for the
added DPS. For tanking, it is recommended to trait either 2 Way of the
Fist traits and 5 Way of the Shield traits or trait the Fist and Spear
mastery skills (instant gambit builders) and 5 Way of the Shield traits,
depending on whether you need to build aggro faster or build gambits
faster. You would think that equipping more Way of the Fist traits would
be better because fist is the symbol that denotes threat, however the
traits in this line DO NOT increase the threat generated by your
gambits and skills. The traits in this trait line either reduce
resistances to Gambits or affect how many or how strong the pulses are
in skills, such as Brink of Victory and Surety of Death. The reason why a
Warden should trait 2 traits in this trait line is because the set
bonus for 2 traits adds 10% threat generation to ALL skills.
However, the ability to generate gambits faster may be less than, equal
to, or greater than the extra threat generation, depending on your
build.
Good Way of the Fist traits include the Force of Personality
(level 40 deed) as it greatly reduces a mobs ability to resist fist
gambits, i.e. Fierce Resolve and Exultation of Battle that as noted are
invaluable to a Warden. At lower levels, Deadly Insult reduces resist to
Warden's Taunt and Know Your Enemy increases the amount of targets on
Goad to 6 (both of quick you'll find most useful).
Good Way of the Shield traits include Never Say Die and
Perseverance, each of which adds one pulse to your HoT gambits. Other
traits that are recommended are Efficient Shield Work that reduces the
power cost of shield gambits. Master of the Shield is a must for reasons
mentioned above and Ward of Justice increases the bonus to your B/P/E
from skills like Shield Mastery. The reasons the Way of the Shield
traits are so highly recommended are the trait set bonuses that increase
evade and block ratings and add 10% incoming healing to HoTs.
Legendary Traits
The question asked first when it comes to legendary traits is do you use
a weapon affected by Grand Master Weapons Training? If so, it's a good
idea to trait, though this leaves you only 2 legendary slots. If you
don't use one of those weapons, then you have 3 slots. However even if
you do have a weapon affected by GMWT, it my might be best to unequip
it. So which traits should you choose? Well, Javelin of Deadly Force is a
good one, but not necessarily the best. The rest is up to you. Of the
other 6, the following are probably the better options: Way of the
Shield capstone trait for its buffs to HoT magnitude and extra HoT
pulses and Defiant Challenge, which gives you a 5 icon gambit the
effects of which are described above. The last legendary that you might
want to slot is Way of the Warden which gives you a stance with
components from the 3 non-legendary stances.
LI Legacies
Wardens get two weapons as their legendary items, unlike most classes
that get a weapon and a class item. The first weapon takes the melee
slot. The choice of weapon type is up to you. SoM has introduced weapon
speed standardization, i.e. all single hand weapons have the same speed
and DPS, as do all 2-handers. this makes your choice of main hand weapon
more a choice of aethstetics than anything else, however, Warden
Passives mean you get additional damage from spears, swords and clubs
and a better passive for that weapon type. Essentially, spears get
better chance to proc a considerably bigger bleed, swords have increase
to-hit percentage and club gets increased chance to slow targets speed.
The second weapon is a Javelin.
SoM has introduced legacy pools, Pool A has the most sought after legacies for that weapon/item and and are received at ID. Pool B has legacies that are not as valuable, but help round out a weapon and are received during reforges on levels 10, 20 and 30. It should be noted thought that Pool A legacies have a slight chance of appearing during a reforge.
SoM has introduced legacy pools, Pool A has the most sought after legacies for that weapon/item and and are received at ID. Pool B has legacies that are not as valuable, but help round out a weapon and are received during reforges on levels 10, 20 and 30. It should be noted thought that Pool A legacies have a slight chance of appearing during a reforge.
Volume 3 Book 3 (also known as Update 2) has brought with it
further updates to the LI system, you can now have a nearly perfect
tanking weapon by leveling legendaries to level 30 and then deconning
them, at which point you can extract the legacy you want from it. be
aware however that while pool A legacies can be exchanged for any other
legacy, pool B legacies cannot be exchanged for pool A legacies.
WARNING: due to the way the LI system works and since the most sought after legacies are in Pool A expect to have a limited choice of pool A slots in your weapon, please choose carefully. Also, legacies from weapons level 59 and lower cannot have legacies extracted from them placed on a level 60 and above weapon. this limitation however does not exist for the various ages, so you can place a legacy from a 3rd age weapon on a 2nd or 1st.
Javelin Legacies
Legacies on your javelin are buffs to gambits and various skills whose purpose isn't damage.
For tanking the legacies you'll want on a Javelin are:
For tanking the legacies you'll want on a Javelin are:
- Conviction heal bonus (Pool A) – an improvement to an already great gambit, also helps with threat generation because more healing means more threat generated, and because heals have a global threat component, i.e. all the mobs currently active will be affected by this gambit, so you'll be helping keep the ranged mobs off of healers as well as helping with healing the group.
- Dance of War Evade rating (pool A) – does what the name says. While it doesn't increase your threat in any way, it does increase your evade which means you'll be hit less by mobs which means you're making your healer's job just a bit easier. It is worth mentioning that at level 60 Shield Mastery will probably cap your Block and Evade rating, however, any rating points above cap will transfer to partial Evade chance.
- Dark Before Dawn power restore (Pool A) – adds up to 20% more power restored when gambit is used though, since the gambit requires you to have 50% morale or less and since most healers will keep you above that level, it is not likely you'll get much use out of this legacy. It is great for morale surfing while in solo play.
- Conservation ICPR (Pool A) – adds to Conservation ICPR. While having this legacy at rank 1 is a great bonus, many Wardens say that leveling it beyond the first few levels is not a great idea since each rank adds very few ICPR points. Has been altered with SoM, base bonus is lower and the bonus at the max rank is greater.
- Shield Mastery block rating (Pool B) – for reasons much the
same as Dance of War's evade rating, though like with the case of DoW
your block will probably be capped by using Shield Mastery.
- Power Safeguard Gambit Line (Pool A) - reduces power consumption for Safeguard, Celebration of Skill and Restoration, up to 10%. useful for when your healer goes down, is busy or not healing you enough. not a must, but has its benefits.
Melee Weapon Legacies
Main hand legacies tend to affect either damage components of gambits or increase the threat generated by a gambit.
- War Cry threat up (Pool A) – since this gambit is quick to build it is a great way to start a fight against multiple mobs, thus, if you can get this gambit to generate more threat you'll be able to build a threat lead faster and later on lock threat onto you.
- Exultation of Battle threat up (Pool A) – works much like the War Cry legacy, but since this skill is an integral part of any Warden's rotation, due to its effects (as listed above) any improvement to it makes an already great skill even better.
- Wall of Steel parry rating (Pool A)– increases parry buff from WoS. This legacy is good for reasons much the same as the Dance of War evade buff legacy. Unlike Evade and Block, your Parry rating isn't improved with Shield Mastery, but if WoS is not be part of your rotation while tanking, it's not that important.
- Spear of Virtue threat up (Pool A) – not a required legacy but useful against single targets as it allows this gambit to build even more threat. Against single targets, unless you also have the Spear of Virtue damage up legacy, Precise Blow will build x2 the amount of damage in less than half the time (length two gambit compared to a length four gambit that also has an animation).
- Wages of Fear positional damage (Pool A) – see a mob with its back to you? Great, this legacy will increase the damage done when using this skill from this spot, so when starting a fight against a single target you'll have an even bigger lead on threat. In the end game, when even small mobs start with thousands of points of morale, although useful, this legacy will not add very much weapon aggro.
- Power Fierce Resolve Gambit Line (Pool A) - reduces power consumption on Fierce Resolve, Resolution and EoB, up to 10%.
Tanking
The main point of this guide is to help new Wardens in the tanking
role. I should point out that a commonly accepted notion amongst Wardens
is that a Warden doesn't receive his most useful gambits till level 48
when he receives Exultation of Battle and at 58 when he receives
Conviction.
Tanking without these gambits, while possible, is considerably harder.
I will deal with tanking at the end game, but most of these tips are
true for all levels. Firstly, when tanking with a PUG you should always
explain to them some of the mechanics of the Warden since most people,
due to some misconceptions about Wardens, have never had a Warden tank
before or think that Wardens can't tank, again due to same
misconceptions. Secondly, if you need the group to do something to help
you do your job better, than tell them so. It may a bit annoying to do
this every time and it may be irritating to the group, but in the end
having the group accept what you need to tank well will make you succeed
and allow you to complete the quest/instance you are currently working
on. What you require can vary based on your skill, your experience and
group make up, but following is a list of requirements you should always
keep in mind since they make tankingn easier:
- Only you start a fight. Why? Because the person starting a fight always has a good lead on threat right off the bat, so by allowing you to start the fight you are putting your self at the top of your target's list. It is important to mention though that this "first blood" threat is not much threat, but I think it is better to start at the top then have to work your way up. The main point of you starting a fight though is to allow requirement number 2 to work.
- Do nothing in the beginning, what does this mean? Tell your group that when a fight is started they should wait a bit, allow you to build and execute a couple of gambits and then join in. This allows you to build up even more threat before the group joins in the fight which will allow you to keep threat while using defensive gambits such as Shield Mastery. You can then return to your regular rotation of skills.
- Target only my target. This should be true of any group with any tank of any class, but it helps a Warden quite a bit because as you use skills on a certain mob you are building even more threat on that mob so there is a considerably smaller chance that a group member will pull another mob off of you and on to them.
Rotation or Which Gambit and When
Every Warden should develop a rotation with which they feel
comfortable and one that works for them, not all Wardens are alike in
build, let alone play style, so it's important to find out what works
for you.
A good start to fight against multiple mobs is Javelin of Deadly Force
(or other ranged skill if JoDF is not equipped) then War Cry, Exultation
of Battle and then Conviction to build up your threat even more by
taking from others, you can then use Shield Mastery and continue on your
rotation. It should be noted that Wardens have an easier time tanking
against multiple mobs because then we can use morale leaches and keep
ourselves healed.
A good start to a fight against single target begins much the
same as a group fight with a Javelin skill. Ambush is always good
because it locks the mob in place. You can run up to it and the mob
cannot reposition or you can start unloading ranged skills. While the
mob is stunned from ambush, it has no Block/Evade/Parry. When running
up to an ambushed mob, you can either build a gambit with mastery skills
or you can fire off a ranged shot. You can Critical Strike it while
it's down then either fire off Wages of Fear (if the mob fell facing
away from you) or you can circle strafe around behind it to fire off
Wages of Fear from behind while the mob is getting to its feet. Then
start rotating skills like Precise Blow, Conviction and other
self-buffing and aggro generating gambits, like more Precise Blows or
DoT gambits. Precise Blow should even be used multiple times at the
start of a fight because its effects stack with themselves and you're
getting multiple pulses of large amounts of threat. Spamming this gambit
multiple times will usually pull a target on to you and off a group
member.
The Kite Tank Strategy
Wardens are in a unique position where they can build and execute their
gambits without being in contact or even facing the mob they are
targeting, thus you can minimize damage done to you and still tank mobs
and bosses that can deal massive amount of damage in single hits, bosses
like Igash in the Grand Stair where staying with in his line of sight
or being near him mean he can hit you with thousands of damage points
within seconds. Virtually every gambit except for Conviction and Dance
of War require that you melee with the mob in order to execute it,
though.
Force Taunt Immune Mobs
Wardens are in a unique position where they can build and execute their
gambits without being in contact or even facing the mob they are
targeting, thus you can minimize damage done to you and still tank mobs
and bosses that can deal massive amount of damage in single hits, bosses
like Igash in the Grand Stair where staying with in his line of sight
or being near him mean he can hit you with thousands of damage points
within seconds. Virtually every gambit except for Conviction and Dance
of War require that you melee with the mob in order to execute it,
though.
The Math
The point of this part of the guide it to better explain some
elements of threat generation. Some basic information before we begin
(based on posts by Graalx in the Warden forum):
- threat magnitude is as follows:
- Slightly Increased Threat = 0.5 * T(hreat from auto-attack)
- Moderately Increased Threat = 1 * T
- Increased Threat = 2 * T
- Greatly Increased Threat = 3 * T
- A skill with an ToT component only will do 4 times as much threat as a skill with direct threat only.
- All threat legacies increase threat generated by a skill, however, there is no mathimatical formula for it. You can be assured that a rank 4 legacy adds more threat then a rank 2 legacy, but that doesn't mean that rank 4 does twice the amount of rank 2.
In order to figure out how much threat a skill generates (not
counting legacies) we will build an equation using the following
variables (based on work of Vmirtehpwn and post by Belaeren):
I = initial threat magnitude; based on tool-tip.
t = threat equivalent to that of single auto-attack.
4 = constant representing ToT pulses.
T = ToT magnitude; based on tool-tip.
The equation will be as follows:
Total Threat = I(t) + 4(T)
Thus, the threat for a skill like Percise Blow shall be calculated as follows:
Percise Blow Total Threat = 2(t) + 4(T) = 6t
In other words, Percise Blow generates 6 times the amount of threat of a single auto-attack.
Threat increasing legacies require a new equation to understand their effects (following based on post by Geoboy). We know that legacies increase threat in a linear fashion, but as we do not know excatly by how much we will assume a 20% increase to the previous rank of threat. Essentialy, if rank 2 generates 120% threat, then rank 3 generates 140% threat.
our variables for this equation will be:
A = initial threat with no legacy.
B = base bonus threat from legacy.
R = legacy rank.
Thus the equation is:
Total threat with ranked legacy = A + B + (B/5)*R.
so for a level 10 legacy the equation is this: A + B + (B/5)*10 = A + B + 2B = A + 3B
This guide was originally found on the LotRO community site and was compiled from many sorces LINK